AWS EC2: Quick Guide to Launch and Manage Instances
17th Apr, 2025 | Jugal S.
Cloud Computing
Introduction
Amazon EC2 (Elastic Compute Cloud) is a web service by AWS that allows users to rent virtual servers in the cloud. It provides scalable compute capacity, making it easier to build and deploy applications without owning physical hardware.
A major advantage of AWS EC2 is its flexibility, allowing users to select from a wide range of instance types and operating systems.
Advantages of EC2
1. Scalability:
With EC2, you can adjust the size of your instances as needed, making it easier for organizations to handle changes in traffic and use their resources more efficiently.
2. Instant Instance Management:
Instances can be launched and terminated on demand ,enabling quick deployment of applications and services while minimizing downtime.
3. Flexible Pricing:
With EC2, you only pay for what you use. You can also choose from different pricing options like Reserved and Spot Instances to lower your costs even more.
4. Global Availability:
You can launch your applications anywhere in the world, thanks to AWS data centers located in multiple regions.
5. Customizable:
With AWS, you can choose from a wide range of instance types and configurations. For example, you can select an instance with 16 GB RAM and 4 vCPUs and run it on Ubuntu, Windows, or other operating systems—whatever suits your application best.
Let’s launch our first EC2 instance and explore related concepts like SSH, user data scripts, and security groups along the way.
1. Open AWS Console
So let’s go to AWS Console
So this is my AWS console
2. Select EC2 service
Now, head to the search bar at the top left, type in “EC2,” and click on the EC2 service from the results.
So now I am on the EC2 instance dashboard, and you can see the instance running. Click on that, and you will get a list of all EC2 instances that are running.
Here’s a list of EC2 instances that are currently running. Let’s go ahead and create our first EC2 instance. Click on button Launch Instances (on top right).
3. Name Your EC2 Instance
Now give a name to you ec2 instance and select AMI
4. What is AMI?
Wait a second - what does AMI mean?
AMI stands for Amazon Machine Image
An AMI is like a ready-made setup that has everything needed to start a virtual machine on AWS. It can include the operating system, software, and settings so you don’t have to set everything up from scratch each time.
Before, setting up servers meant handling real machines, which was slow and hard. Virtual machines made things easier but still needed manual setup. AMIs solve this by giving you ready-made server templates on AWS, so you can launch and manage servers quickly and easily.
You can start EC2 instances using different types of AMIs:
Public AMI: Provided by AWS, like the Amazon Linux 2 AMI.
Your own AMI: Created and managed by you.
Marketplace AMI: Made by someone else and shared or sold through the AWS Marketplace.
AMIs are built for a specific region and can be copied across regions.
5. Ubuntu AMI
Lets give instance name as “web-app” and select free tier eligible Ubuntu AMI
6. Choosing an Instance Type
Now, choose an instance type.
But a question pops into your mind — what exactly is an instance type?
Its hardware configuration of your EC2 Instance
I.e CPU,memory(RAM) ,storage type and network performance
Examples: t2.micro, t3.large, m5.xlarge, c6g.2xlarge, etc.
Think of instance type as choosing the size and power of your virtual computer.
I have selected t2.micro Instance type (free tier eligible)
Private key: You keep this one safe on your local machine (usually a .pem file).
AWS uses this key pair to securely log in to your EC2 instance via SSH (Secure shell).
Lets create a new key pair:
1 . Click on Create new key pair.
a. Give a name to key pair , i have given “web-app-key-pair”.
b. Select Key pair type (I have selected RSA) and private key file format (.pem).
c. Click on "Create key pair" - once clicked, the private key will be downloaded to your local system. Save it to your preferred directory.
8. Network Setting
In the network settings, let's use the default VPC and subnet and enable auto-assign public IP for now.
Let’s focus on Security groups for now.
AWS Security Groups are a virtual firewall for your AWS account. They allow you to control inbound and outbound traffic to and from your AWS resources.
Controls traffic at the instance level, not the subnet level.
You define rules that allow traffic inbound (to the instance) and outbound (from the instance).
Security Groups are STATEFUL (if traffic is allowed inbound it is also allowed outbound).
Rules are defined using:
Protocol (e.g., TCP, UDP, ICMP)
Port number (e.g., 22 for SSH, 80 for HTTP)
Source/Destination IP (e.g., 0.0.0.0/0 = anywhere)
Inbound Rules
These control who can send traffic to your EC2 instance.
Example:
If you want to SSH into your instance, you need to allow inbound traffic on port 22.
Allow SSH (port 22) from your IP.
Allow HTTP (port 80) from anywhere.
Allow MySQL (port 3306) from a specific private IP.
Allow HTTPS (port 443) from anywhere.
Outbound Rules (Outgoing Traffic)
These control what traffic your instance can send out.
Example:
If your app needs to access the internet, allow outbound on port 443 (HTTPS).
In short:
Inbound = who can reach your server
Outbound = who your server can talk to
In the security group, I am allowing SSH traffic on port number 20 from anywhere (0.0.0.0/0) and also HTTP traffic on port number 80 from anywhere.
Currently we will go with Auto assign public IP; later we will discuss elastic IP addresses.
And also we are not concentrating on VPC, so we will go with default VPC.
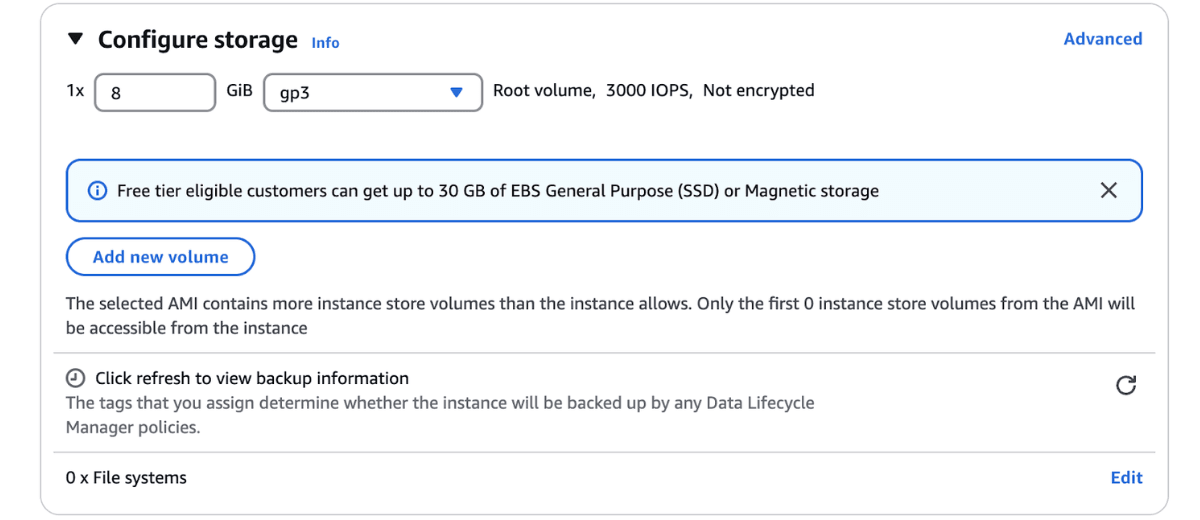
9. Storage configuration
When you launch an EC2 instance, you need to attach storage volumes where your OS, apps, and data will be saved. It is like root volume of your ubuntu or C drive in windows
AWS give you following storage options:
1. EBS (Elastic Block Store) - Most Common
It is Block-level storage for EC2
It is like a hard drive attached to your EC2
You can attach, detach, resize or event back it up (using snapshots)
It persist even after instance is stopped or terminated
The Instance Store provides temporary, high-speed storage that is physically attached to the host computer. It is suitable for temporary data, caches, buffers, and scratch data.
Data stored on an instance store is not persistent. It will be lost if the instance is stopped, terminated, or if the host computer's underlying disk fails.
You cannot boot an EC2 instance from an instance store volume. It's designed for temporary, local storage only.
10. User Data script (Optional)
User data in EC2 refers to a script (usually a shell script) that you provide when launching an EC2 instance. It runs automatically the first time the instance boots up.
Assume like: Instructions you give your EC2 instance to set itself up right after it launches.
What can we do with it?
1. Install software(e.g., NGINX, [Apache](https://www.apache.org/), [Node.js](https://nodejs.org/en))2. Run configuration commands
3. Update packages
4. Start service etc .
E,g Here's a User Data script to install and start NGINX on an EC2 instance running Ubuntu:
We're not using a user data script for this setup. Instead, we'll install NGINX manually on the EC2 instance.
11. Launch Instance
Lets click on “Launch Instance” Button on bottom right corner.
So out instance is created and launched successfully, so lets go to listing of ec2 instances.
Here is the our web-app instance with state Running
Let’s install NGINX directly on our EC2 instance and start the server.
So first we need to connect to instance, so check the ec2 “web-app” ec2 instance and click on connect.
Now select EC2 Instance Connect and click on Connect
Now you will find a terminal like this:
Now to install nginx, Run this command step by step
After starting nginx,
Open your public IPv4 address, or public IPv4 addresses in your browser.
You will get something like this:
By default, NGINX runs on port 80, which is the standard port for HTTP traffic.
So, when you enter your EC2 instance’s public IP in the browser, you’ll see the default NGINX welcome page. This confirms that NGINX is installed and running successfully.
12. Cleaning Up AWS Resources
1. Terminate the EC2 instance from the AWS Console.
Select ec2 instance, go to Instance State, and click on Terminate (delete instance).
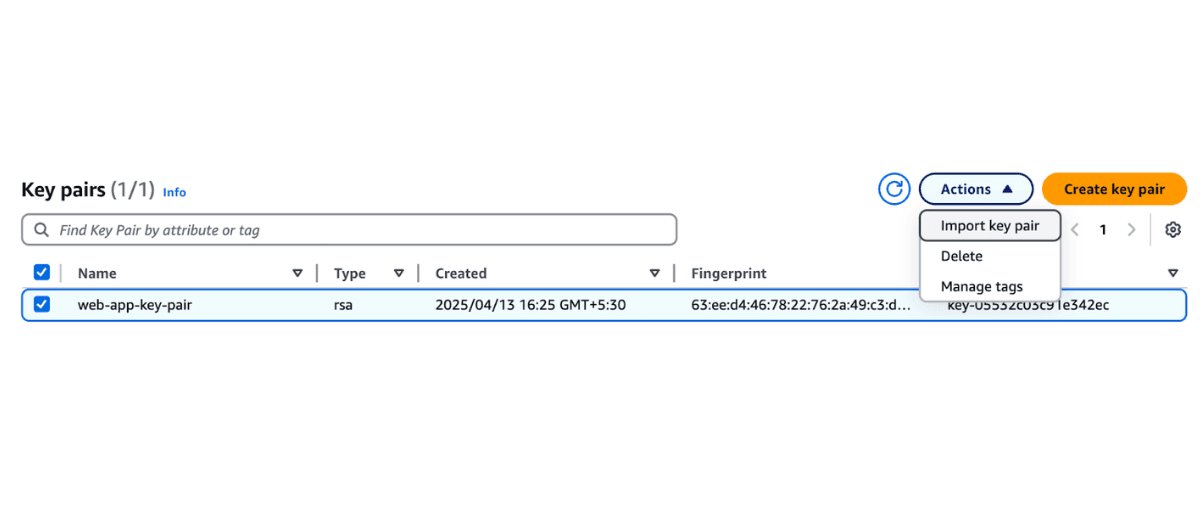
2. Delete the associated key pair, if not needed.
Go to the key pairs section, select a key pair , click on Action, and then delete.
3. Remove any custom security groups you created.
Go to the security group section, select security groups, click on action and then delete.
4. Check for any Elastic IPs (if used) and release them if not attached.
Conclusion
In this blog, we learned how to launch and use an EC2 instance on AWS. Step by step, we created a virtual server, chose the right settings, and installed NGINX to see it running in a browser.
We also covered key concepts like AMI, instance types, key pairs, security groups, and storage. Finally, we learned how to clean up our resources to avoid extra charges.
Overall, EC2 makes it easy to set up servers in the cloud without needing any physical hardware. It's a great way to host websites, apps, or try out cloud computing.
The rapid growth of e-commerce has reshaped the global retail landscape, transforming how businesses operate and how consumers shop.
The evolution of cloud computing has been...
Blog Summary: Cloud computing is essential for Industry 4.0, helping businesses use advanced technologies like AI and IoT to boost efficiency and make better decisions....
The Middle East is quickly adopting cloud computing, keeping pace with other markets. This is due to increased government investments and the establishment of more...


 Here is the our web-app instance with state Running