- 7th Apr, 2025
- Aishwarya Y.
Sync Local Assets to S3 Using Laravel Mix
3rd Aug, 2021 | Akshay P.
- Software Development

When you create assets (js, css) in your laravel application, Laravel Mix is very useful. For basic usage, you don’t need to modify the default configuration file, webpack.mix.js. But when you deploy an app to production, it’s important to take cache busting into account.
This article will show you how to implement cache busting using Laravel Mix and Amazon CloudFront+S3.
Laravel Mix provides a fluent API for defining webpack build steps for your Laravel application using several common CSS and JavaScript preprocessors. In other words, Mix makes it a cinch to compile and minify your application's CSS and JavaScript files.
Amazon S3 or Amazon Simple Storage Service is a service offered by Amazon Web Services that provides object storage through a web service interface. Amazon S3 uses the same scalable storage infrastructure that Amazon.com uses to run its global e-commerce network.
Amazon CloudFront is a fast content delivery network (CDN) service that securely delivers data, videos, applications, and APIs to customers globally with low latency, high transfer speeds, all within a developer-friendly environment.
Installation & Setup
Installing Node
Before running Mix, you must first ensure that Node. js and NPM are installed on your machine:
node -v && npm -v
You can easily install the latest version of Node and NPM using simple graphical installers from the official Node website.
Installing Laravel Mix
The only remaining step is to install Laravel Mix. Within a fresh installation of Laravel, you'll find a package.json file in the root of your directory structure. The default package.json file already includes everything you need to get started using Laravel Mix.
Think of this file like your composer.json file, except it defines Node dependencies instead of PHP dependencies. You may install the dependencies it references by running:
npm install
Running Mix
Mix is a configuration layer on top of webpack, so to run your Mix tasks you only need to execute one of the NPM scripts that are included in the default Laravel package.json file.
When you run the dev or production scripts, all of your application's CSS and JavaScript assets will be compiled and placed in your application's public directory:
// Run all Mix tasks... npm run dev // Run all Mix tasks and minify output... npm run prod
Watching Assets for Changes
The npm run watch command will continue running in your terminal and watch all relevant CSS and JavaScript files for changes. Webpack will automatically recompile your assets when it detects a change in one of these files:
npm run watch
For more detailed information on Laravel Mix and its setup you can visit this link.
Cache Busting Using Laravel Mix
Browsers cache assets for a long period of time unless URL changes, even if you deploy new assets. So it’s very important to force browsers to load the fresh assets instead of serving stale copies of the code. It’s called cache busting.
The default config for Laravel Mix is something like this. You can build JS and CSS out of the box!
const mix = require('laravel-mix');

/*
 |--------------------------------------------------------------------------
 | Mix Asset Management
 |--------------------------------------------------------------------------
 |
 | Mix provides a clean, fluent API for defining some Webpack build steps
 | for your Laravel application. By default, we are compiling the Sass
 | file for the application as well as bundling up all the JS files.
 |
 */

mix.js('resources/js/app.js', 'public/js')
    .sass('resources/scss/app.scss', 'public/css');
With Laravel Mix, you can implement cache busting by calling mix.version() like below:
const mix = require('laravel-mix');

/*
 |--------------------------------------------------------------------------
 | Mix Asset Management
 |--------------------------------------------------------------------------
 |
 | Mix provides a clean, fluent API for defining some Webpack build steps
 | for your Laravel application. By default, we are compiling the Sass
 | file for the application as well as bundling up all the JS files.
 |
 */

mix.js('resources/js/app.js', 'public/js')
    .sass('resources/scss/app.scss', 'public/css');

if (mix.inProduction()) {
    mix.version();
}
It appends the version hash as a query parameter like ?id=29dd19ff849372. Version hash won’t change unless file contents change. This means that the assets URL will change when file contents have any updates. As a result, browsers will load fresh contents instead of the cached stale assets.
The mix() function handles the versioning implicitly in laravel. You can use the mix() instead of asset() in blade templates like this:
<script src="{{ mix('css/app.css') }}"></script>
<script src="{{ mix('js/app.js') }}"></script>
Serve Assets via CDN
The example in the previous section assumes assets are served directly from web servers. This is acceptable for applications that don’t have a large amount of traffic. However, if your application has high traffic or performance is critical, you should serve assets from CDN.
In my case, I use Amazon CloudFront and S3 for CDN. By default, Laravel Mix does not include the functionality to upload assets to S3, so I need an additional setup.
First, install webpack-s3-plugin.
npm i webpack-s3-plugin
Then, create an S3 configuration and pass it to “mix.webpackConfig()”.
const mix = require('laravel-mix');
const s3Plugin = require('webpack-s3-plugin');

/*
 |--------------------------------------------------------------------------
 | Mix Asset Management
 |--------------------------------------------------------------------------
 |
 | Mix provides a clean, fluent API for defining some Webpack build steps
 | for your Laravel application. By default, we are compiling the Sass
 | file for the application as well as bundling up all the JS files.
 |
 */

let webpackPlugins = [];
if (mix.inProduction() && process.env.UPLOAD_S3) {
    webpackPlugins = [
        new s3Plugin({
            include: /.*\.(css|js|woff2|ttf|woff|svg)$/,
            s3Options: {
                accessKeyId: process.env.AWS_ACCESS_KEY_ID,
                secretAccessKey: process.env.AWS_SECRET_ACCESS_KEY,
                region: process.env.AWS_DEFAULT_REGION,
            },
            s3UploadOptions: {
                Bucket: process.env.AWS_BUCKET,
                CacheControl: 'public, max-age=31536000'
            },
            basePath: '/',
            directory: 'public'
        })
    ]
}

mix.webpackConfig({
    plugins: webpackPlugins
});
I have stored AWS credentials in .env file:
AWS_ACCESS_KEY_ID="YOUR_AWS_ACCESS_KEY_ID"
AWS_SECRET_ACCESS_KEY="YOUR_AWS_SECRET_ACCESS_KEY"
AWS_DEFAULT_REGION="YOUR_AWS_BUCKETREGION"
AWS_BUCKET="YOUR_AWS_BUCKET_NAME"
In package.json , I have two scripts for the production build. The “production” command builds assets for production but doesn’t upload them to S3. The “production-upload-s3” command uploads them to S3 because it sets “UPLOAD_S3 = true”.
"scripts": {
  "prod": "npm run production",

  "production": "cross-env NODE_ENV=production node_modules/webpack/bin/webpack.js --no-progress --hide-modules --config=node_modules/laravel-mix/setup/webpack.config.js",

  "production-upload-s3": "cross-env NODE_ENV=production UPLOAD_S3=true node_modules/webpack/bin/webpack.js --no-progress --hide-modules --config=node_modules/laravel-mix/setup/webpack.config.js"
},
Now in order to reference assets in the blade template I have implemented two custom helper functions.
-
Function custom_asset() for accessing normal assets.
-
Function custom_asset_mix() for accessing mix assets.
Both functions reference CDN assets only in the production and staging environment since I wanted to reference local assets during development.
<?php

if (! function_exists('custom_asset')) {
    /**
     * Get the path to a file.
     *
     * @param  string  $path
     * @return \Illuminate\Support\HtmlString|string
     *
     * @throws \Exception
     */
    function custom_asset($path)
    {
        $env = env('APP_ENV');
        $cdnUrl = env('CDN_URL');

        // Reference CDN assets only in production or staging environments.
        // In other environments, we should reference locally built assets.
        if ($env === 'production' || $env === 'staging') {
            $path = $cdnUrl."/".$path;
        } else {
            $path = asset($path);
        }

        return $path;
    }
}

if (! function_exists('custom_asset_mix')) {
    /**
     * Get the path to a versioned Mix file.
     *
     * @param  string  $path
     * @param  string  $manifestDirectory
     * @return \Illuminate\Support\HtmlString|string
     *
     * @throws \Exception
     */
    function custom_asset_mix($path, $manifestDirectory = '')
    {
        $mixPath = mix($path, $manifestDirectory);
        $env = env('APP_ENV');
        $cdnUrl  = env('CDN_URL');


        // Reference CDN assets only in production or staging environments.
        // In other environments, we should reference locally built assets.
        if ($env === 'production' || $env === 'staging') {
            $mixPath = $cdnUrl.$mixPath;
        } else {
            $mixPath = asset($mixPath);
        }

        return $mixPath;
    }
}
I have also defined a CDN base URL in the .env file.
CDN_URL="YOUR_CDN_URL"
You can use these functions in blade templates like this:
<script src="{{ custom_asset('css/app.css') }}"></script>
<script src="{{ custom_asset_mix('js/app.js') }}"></script>
Setup CloudFront+S3
Now you can upload assets to S3 and reference asset URLs in CDN. If you haven’t setup CloudFront and S3, the basic setup is described in the AWS official docs.
Cache Based on Query String Parameters
By default, CloudFront doesn’t cache contents based on query string parameters. Let’s say, if you have app.js?id=1111 and app.js?id=2222, CloudFront ignores id parameters and just creates a cache as app.js.
This means that when you upload a new version of app.js to S3, CloudFront won’t update the cache and will serve stale contents to the client unless you invalidate the cache.
However, you can configure CloudFront to cache contents based on query string parameters. CloudFront will create a cache for app.js?id=1111 and app.js?id=2222. A new cache will be created every time you deploy a new version of your app.
So, let’s edit CloudFront settings!
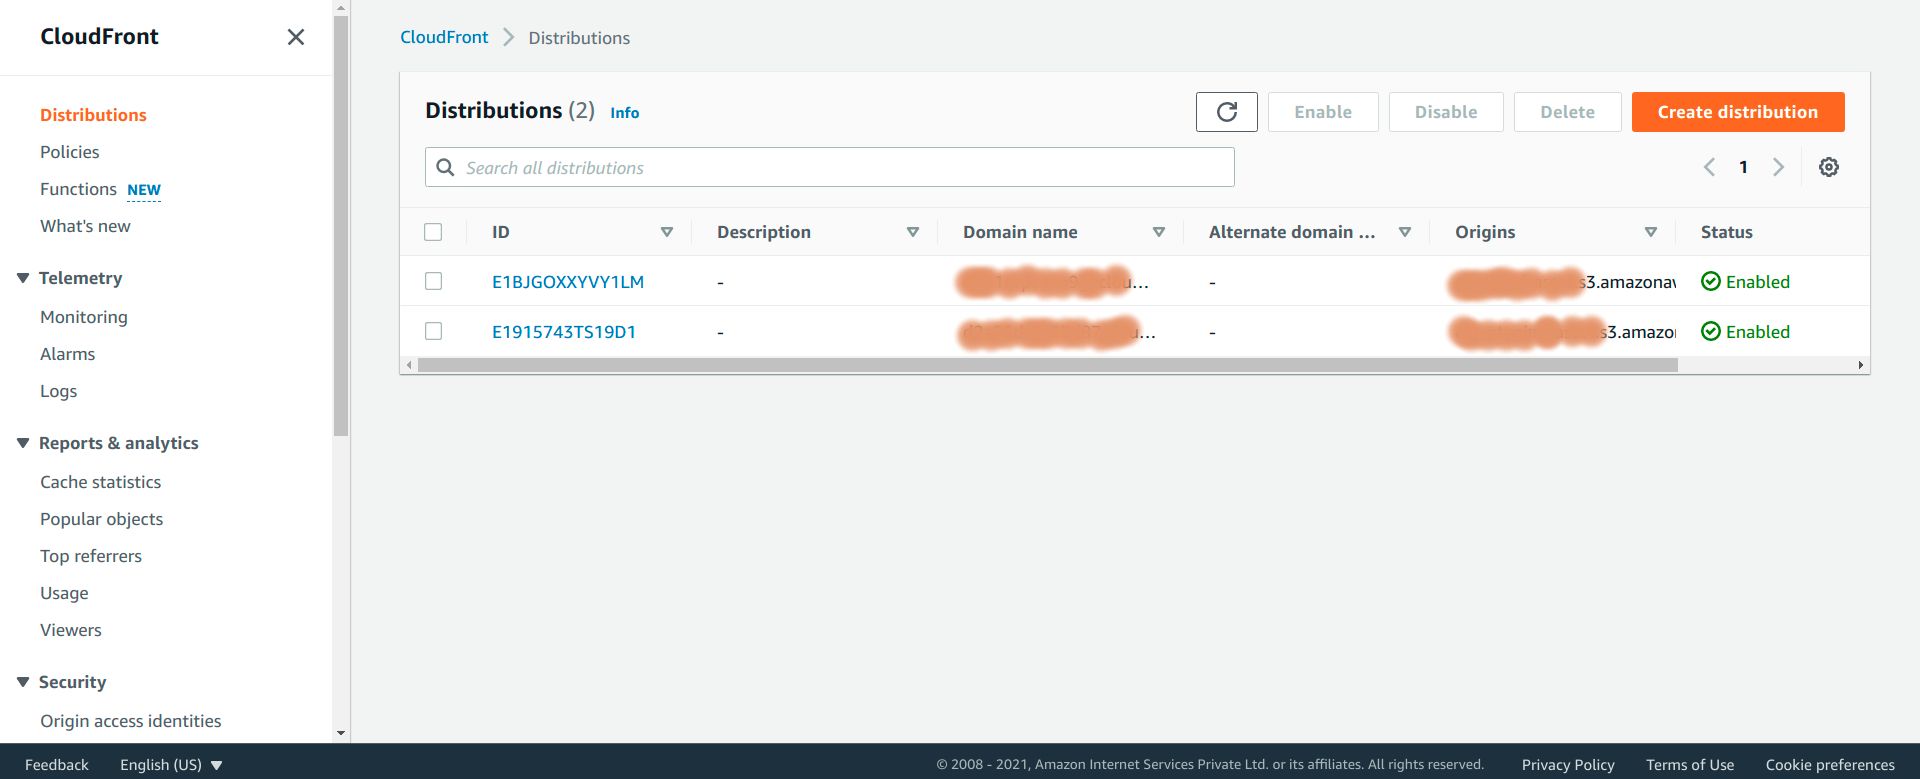
Step 1: Select the newly created distribution to edit it.
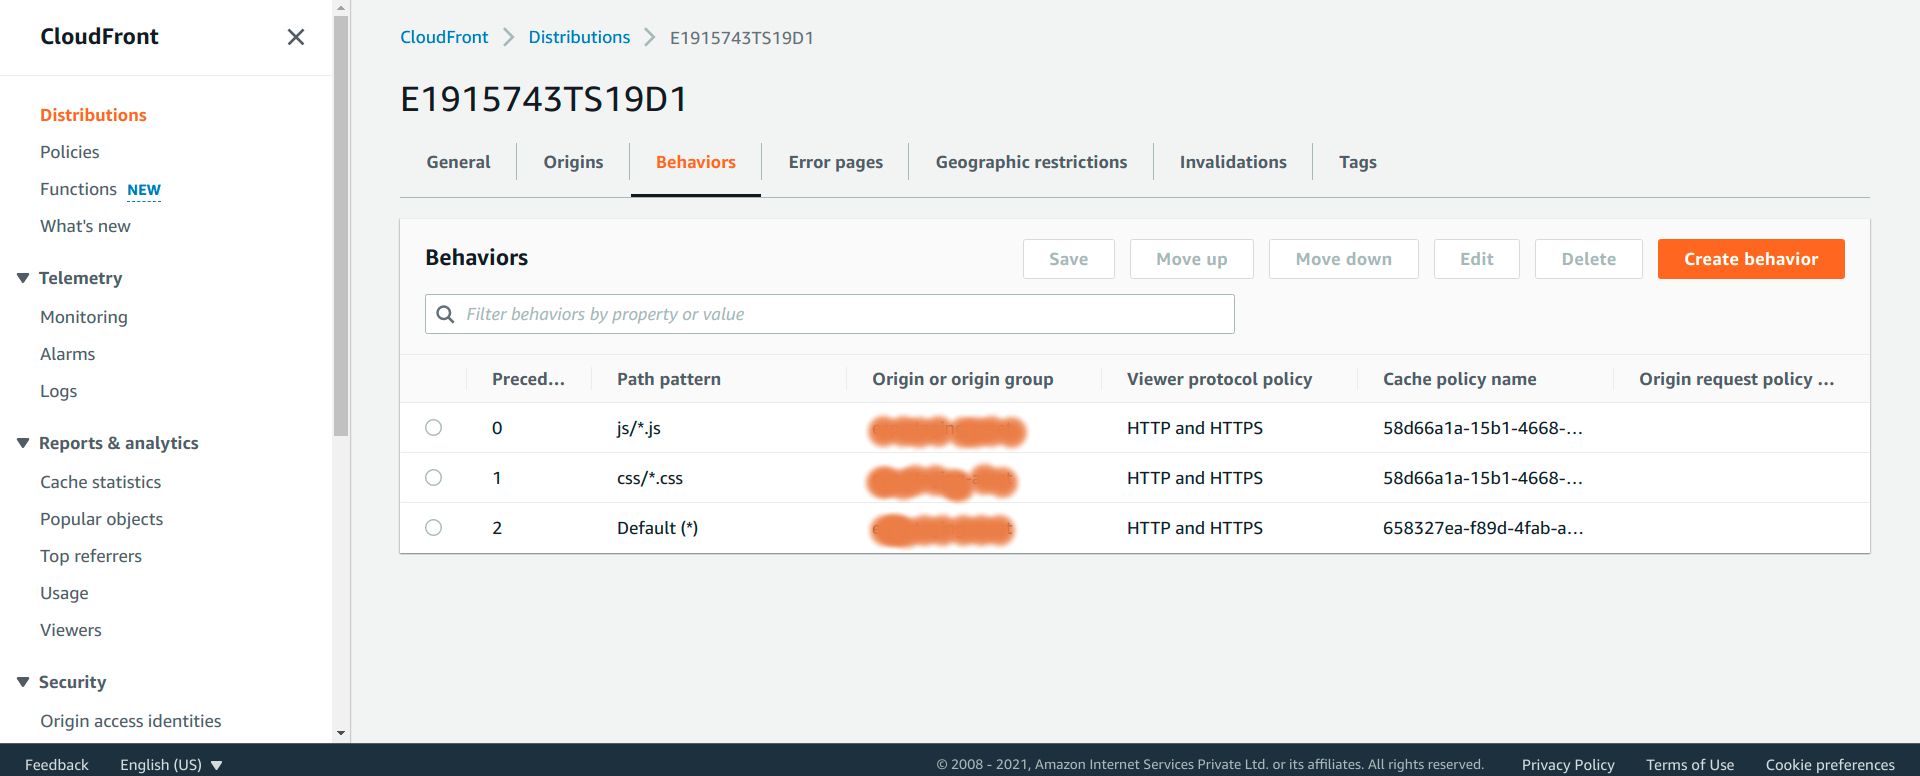
Step 2: Under the “Behaviours” tab click on the “Create behaviour” button. You can also edit the existing default behaviour, it totally depends on your requirements.
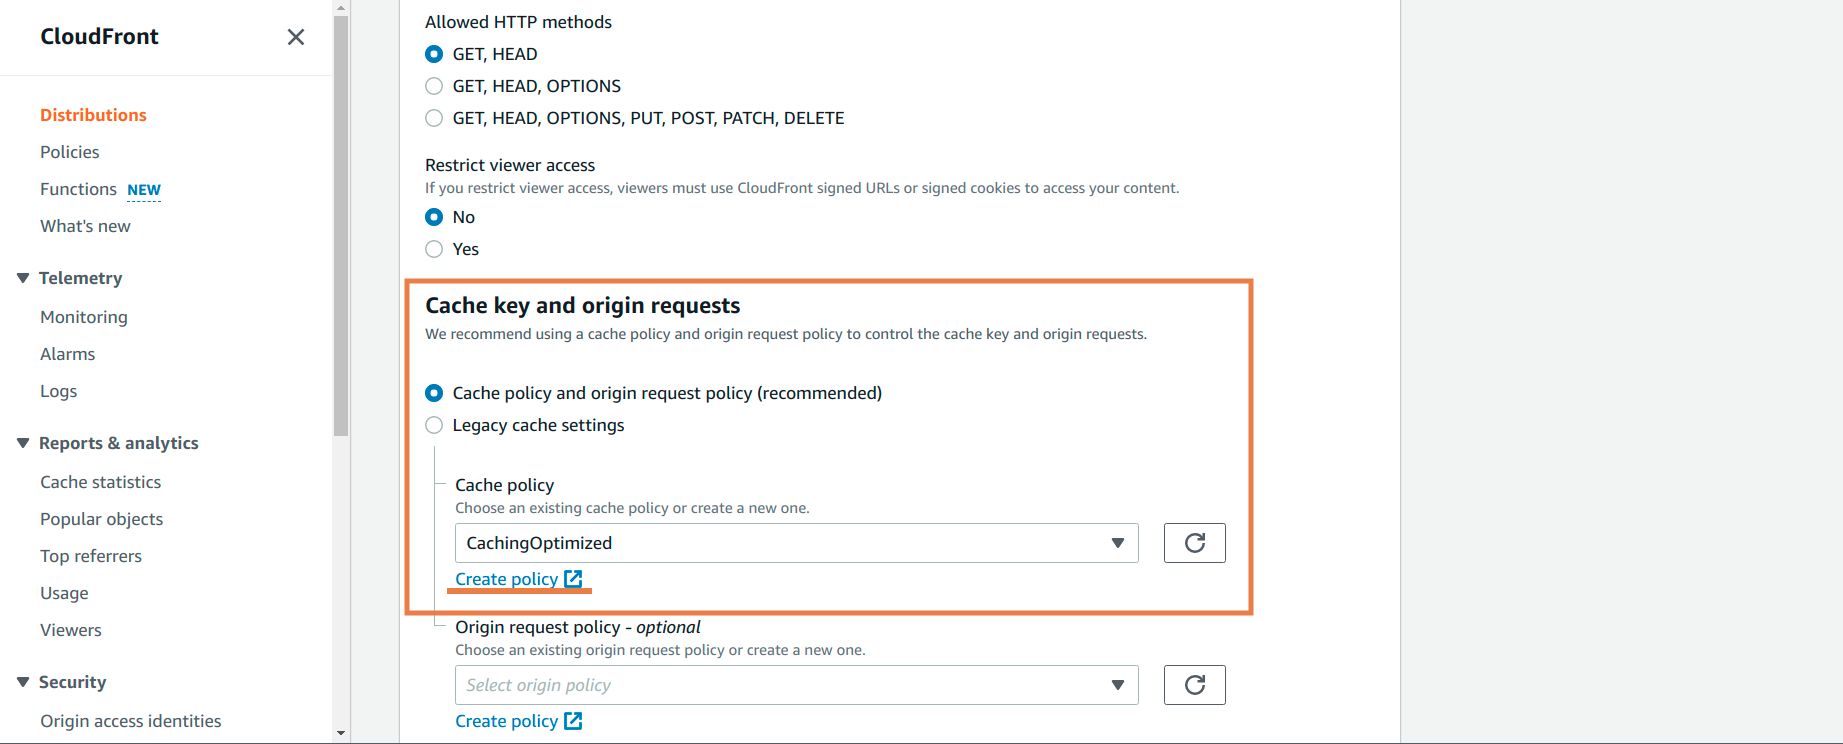
Step 3: Scroll down to the “Cache key and origin requests” section, look for the “Cache policy” option and then click on “Create policy”. This will redirect you to a new page for creating policy.
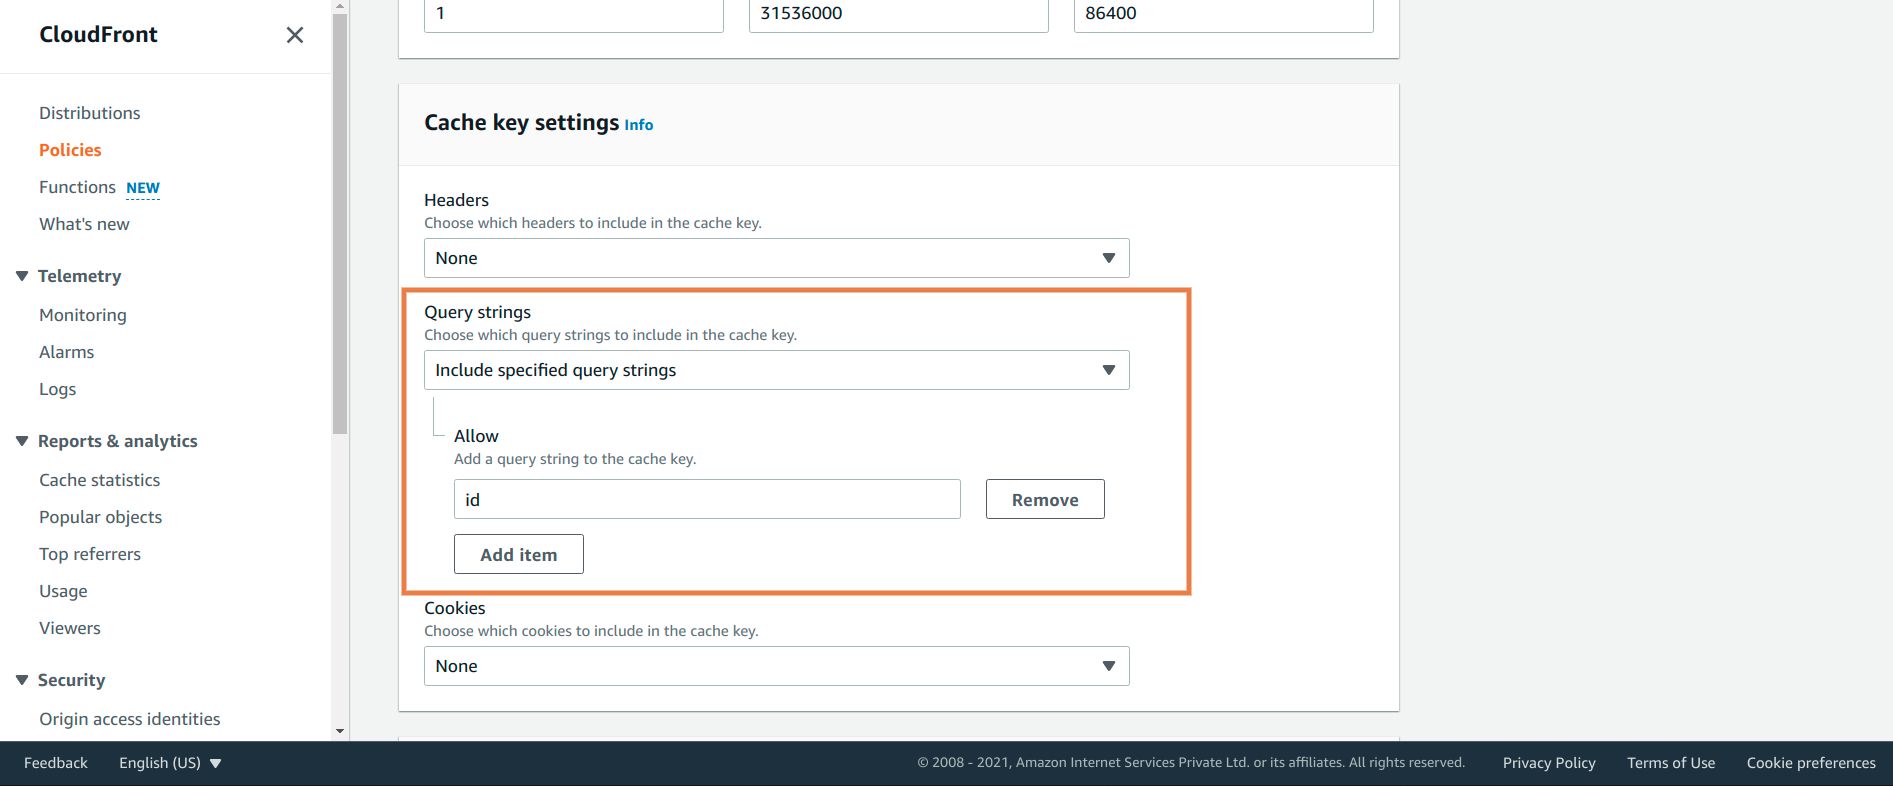
Step 4: On the create policy page, scroll down to the “Cache key settings” section and under “Query strings” select “Include specified query strings” from the dropdown and then add “id” in the allow section.
Step 5: Now select the newly created policy from the dropdown menu of cache policy.
Deployment
It depends on how your deployment workflow is. In my case, I build assets and upload them to S3 by executing npm run production-upload-s3 on CI.
Conclusion
In this article, you learnt about how to setup laravel mix in your project, implement cache busting using Laravel Mix and Amazon CloudFront+S3, and how to cache contents based on query string parameters by creating behaviours and assigning cache policy in your CloudFront distribution.
References:
More blogs in "Software Development"
- 20th Dec, 2024
- Vikram M.
Cost to Build an AI Trading App Like Thinkorswim: 2025
- 6th Jan, 2025
- Kinjal D.
Restaurant Mobile App Development: A Complete Guide For 2025
Join our Newsletter
Get insights on the latest trends in technology and industry, delivered straight to your inbox.


